Resource Highlights
In this article, you will find some guidance on why continuing education is critical to success. Including, why maintaining best practices can help eliminate a potential misdiagnosis or part failure and a step by step guide for compressor failure.
.tmb-1920w.jpg?Culture=en-GB&sfvrsn=c70917c0_32)
It goes without saying… Continuing education is critical to success.
Every year the technology gap between original equipment and the aftermarket shrinks. Knowing the latest repair trends can help improve service turnaround, avoid comebacks and increase overall customer satisfaction.
The same can be said for seemingly simple repairs – whether complex or simple, maintaining best practices can help eliminate a potential misdiagnosis or part failure.
Best Practice # 1: Compressor preparation prior to operation
Would you expect a rebuilt engine to run properly if it wasn’t pre-lubed or only had one quart of oil in the crankcase on initial startup? Of course not.
The same can be said for a compressor. There’s no difference. In order for the compressor to operate correctly on startup, it must have the accurate amount of oil inside and be turned over, by hand, using the right compressor turning tool, so all the components inside are “prelubed.”
Failure to complete this pre-lubrication process prior to compressor operation can lead to noise complaints and premature failure. There are two types of compressors – with oil and without oil. Compressors with oil (pre-lubed) need to have the new oil drained, and the correct oil amount and type reinstalled. Dry compressors, or compressors without oil, need to have the correct amount and type of oil added prior to compressor operation.
Regardless of compressor type, instructions included demonstrate how to correctly lubricate and rotate the compressor prior to operation.
Best Practice # 2: Flushing the A/C system
When flushing the A/C system with chemicals, ensure no residual flush is left behind. If there is, it could dilute and contaminate the compressor lubricant, leading to compressor noise and premature failure.
If you are flushing an A/C system, it is critical you use the approved OEM equipment, flushes and procedures to help minimize concerns with potential residual flush.
Best Practice # 3: Use lubricant recommended
Seems simple… use the lubricant type recommended in the instructions that come with the new compressor. Unfortunately compressors fail every day by having the wrong lubricant.
Without the correct lubrication, the compressor has little or no chance of long-term stability. There are a number of lubricant types on the market depending on the A/C system. PAG oil is the most common. It is important that high quality PAG oil be used and the technician follows the directions included with the new compressor so the correct type and amount of oil is utilised, and in the proper location.
Ester oils are also available, but should not be used as they can break down under high heat conditions, resulting in lubrication and compressor failures.
Step by Step
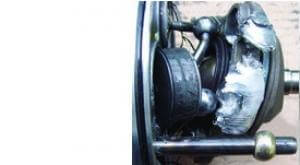
Step 1 : Rotating Assembly
This is the rotating assembly of an A/C compressor, which was destroyed by lack of lubrication at start up.
Notice the gun metal blue color of parts which over-heated and seized causing, a catastrophic failure.
Step 2: Destroyed Reciprocating Assembly
This is a destroyed reciprocating assembly from a compressor that failed due to lack of lubrication.
The lubricant removed from the compressor was thin (had poor viscosity) and had a chemical flush odor.

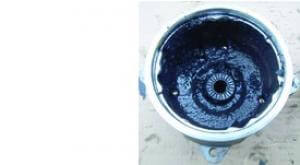
Step 3: Failed Compressor
This is the inside of a failed compressor, showing lubrication that has become a thick, black sludge.
Ester oils, which are not recommended for use in Delphi compressors, can experience thermal breakdown in high heat conditions, and form sludge like this.
Step 4: Lubricating Compressors
When lubricating compressors with a crank case plug, be sure to remove and install all lubrication through this opening so the oil can get directly to the rotating assembly inside the compressor.
Step 5: Changing A Compressor
Why and When do you have to change the compressor?
- Lack or excess of refrigerant oils
- Internal corrosion
- Lack of servicing (regular changing of receiver drier)
- Circuit blocked – receiver drier clogged and/or expansion valve blocked
- Incorrect or no flushing of system when fitting new compressor
- Electrical problem in the clutch
Faulty compressor generates:
- A/C system does not operate at all
- Potentially result in damage to other A/C components
SIGN UP TO FIND MORE
Fill up your details to hear more from our experts and get the latest updates from Delphi.

Diagnostics
Discover our extensive range of OE-level diagnostic and test equipment for quicker, more accurate servicing and repairs.

Training
Choose from our expert-led, accredited training courses to enhance your skills and prepare you for the vehicles of tomorrow.

Find out where to buy Delphi parts