- Product Information
- Product Resources
- Enquire
- Related Products
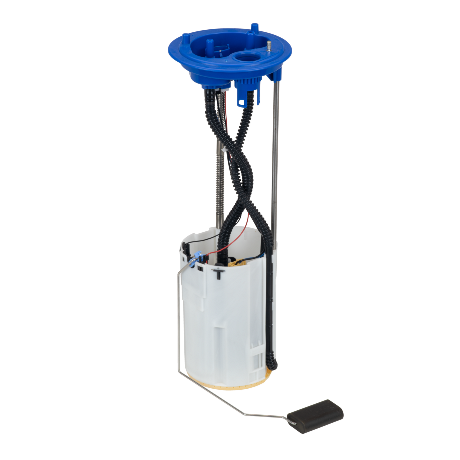
Distinctly Delphi Fuel Pumps
- Anodized aluminum can reduce flow loss by up to 100% in severe contamination
- New carbon commutator extends fuel pump life by up to 300% over commonly used copper commutators by reducing oxidation and premature wear*
- Over-molded armature protects pump windings in corrosive environments
- Button style contacts feature additional wear material that can last for over 1 million cycles
- High capacity synthetic mesh inlet filter is able to filter out all items larger than 30 microns
- Distinctly Delphi with an electric blue fuel pump top, module top cover and strainer material
*In contaminated fuel or fuel with alcohol blends
| Delphi part number | Popular Applications | EMEA car parc |
| FG1455-12B1 | AUDI A1/A1 Sportback/S1 Quattro/S1 Sportback Quattro, SEAT Ibiza/Ibiza SC/Ibiza ST/Toledo, SKODA Fabia/Fabia Scout/Rapid/Rapid Spaceback/Roomster/Roomster Praktik/Roomster Scout, VW Polo | 12.4M |
| FG0989-12B1 | AUDI A3/A3 Cabrio/A3 Quattro/A3 Sportback/A3 Sportback Quattro, SEAT Altea/Altea Freetrack/Altea XL/Leon/Toledo, SKODA Laura/Octavia/Octavia Scout/Yeti, VW Beetle/Bora (Jetta)/Eos/Golf/Golf Cabrio/Golf Estate/Variant/Golf Plus/Golf Van (Variant)/Jetta/Jetta Wagon/Scirocco | 9.2M |
| FG1061-12B1 | ABARTH 500/500C/595/595C/695, FIAT 500/500C/500S/Panda/Panda Classic/Panda Van | 8.9M |
| FG1070-12B1 | AUDI A3/A3 Quattro, SEAT Leon/Toledo, SKODA Octavia/Roomster/Roomster Praktik/Roomster Scout, VW Bora/Bora Estate/Variant/Cabrio/Golf/Golf Cabrio/Golf Estate/Variant/Golf Van (Variant)/Jetta/Jetta Wagon/New Beetle | 5.6M |
| FG1498-12B1 | CITROËN C1, PEUGEOT 107/108, TOYOTA Aygo | 5.3M |
.tmb-660w.jpg?Culture=en-GB&sfvrsn=a9375dbb_1)

The Delphi Difference
-
100 years of OE experience, supplier to the world’s top automakers
-
OE heritage and knowledge built into every aftermarket part
-
Comprehensive portfolio for a wide range of vehicles and model years
-
Streamlined SKUs for easy inventory management
-
Support through tools, tips and training

Related product resources and downloads
Resource Highlights
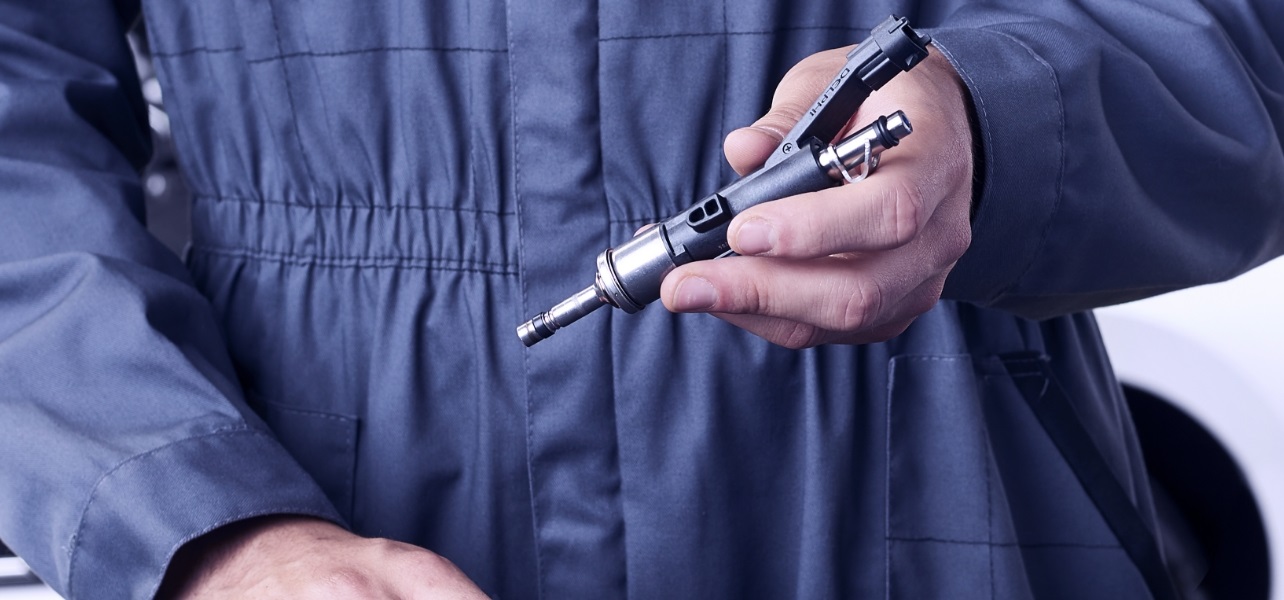
In this article you will find a step-by-step guide on how to remove and replace a diesel common rail injector.
Before working on any high-pressure diesel system its good process to make sure that we've no residual pressure inside the vehicle. We can find that out by plugging in a diagnostic tool.
Safety:
Make sure you are wearing gloves and goggles.
Step 1:
By removing the cover, we can see the common rail system. We're going to start by removing the injector pipe, When you are doing the pipes make sure that any exposed parts are capped because of the risk of contamination. Next, remove the back linkage, on this particular application you're going to have to remove the globe connector using a pair of pliers. Next, remove the electrical connection. This now leaves the retaining clamp holding the injector. Finally, withdraw the injector from the seat.
Step 2:
Fit a repaired injector from the Delphi repair network. Make sure that the injector is the correct part number, all Delphi injectors are vacuum sealed to ensure cleanliness. Prior to fitting the injector, you need to note down the correction code.
Step 3:
To refit the injector you are going to remove the protective cap from the nozzle and slide the injector carefully into its place. Now, refit the retaining clamp. Next, refit the electrical connector, the back leakage, and the glow plug.
Step 4:
Now that we've fitted the injector, we need to refit the high-pressure fuel pipe. Using the correct tooling you’re going to apply the correct torque to the pipe. The physical repair has now been completed.
Step 5:
Enter the code so that the control unit of the vehicle, can tally up with the injector we've just fitted
Step 6:
Lastly, confirm your repair by starting the vehicle up. Now that we've entered the code the control unit and the injector should be tied up.
That's how to replace a Delphi common rail fuel injector. Three key points are safety, cleanliness, and genuine parts.

Visit our Technician Library for access to Documents and Downloads
Get in touch
Find out where to buy Delphi parts