
Resource Highlights
In this article you will find out about the ABS sensors:
Whilst traditional braking components may not have changed much, the addition of electronic controls has made braking systems much safer and smarter than ever before. Technology such as anti-lock brakes (ABS), electronic stability and brake assist are now common place. However, none of these would be possible without one small, but important device; the ABS or wheel speed sensor. And since a faulty sensor can negatively affect the operation of these systems, knowing what this sensor does, why and how it fails and how to diagnose and replace a faulty sensor is critical.
What does the ABS sensor do and how?
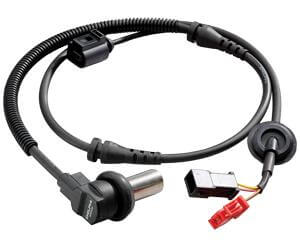
In short the ABS sensor, monitors the wheel’s speed and rotation to optimize both brake and traction control via the ABS. Typically installed at the wheel, it consists of two components: a reluctor wheel or tone ring positioned on the axle, which rotates with the wheel, and either a magnetic or hall effect sensor which sends the data to the ABS control module. The wheel speed data is used to determine when to activate the ABS and how much pressure it should safely apply to stop the vehicle without locking up the brakes. The wheel speed information is also provided to other systems (engine, transmission, navigation, and chassis control systems) via data lines by the ABS control unit.
Why do ABS sensors fail?
Given its position, the reluctor wheel or tone ring can easily become dirty or damaged. Similarly, dust can collect on the sensor. Both could result in an erratic, or even no signal at all. Other common causes of failure include:
- Breaks in wiring/sensor winding due to excessive vibration
- Internal short circuits
- Increased wheel bearing clearance
- Damage during replacement of other braking components
What to look out for in a failing ABS sensor?
A faulty ABS sensor will impact a number of important braking functions and will exhibit some obvious warning signs including:
- ABS light: this is normally the first sign that there’s a problem with the ABS system – this could be caused by either a sensor or the control module.
- Traction control light: since the ABS sensor also feeds data to the traction control system, issues could illuminate this light too.
- Reduced stopping power under heavy braking: the vehicle may take longer to stop or experience a loss of traction and control when braking heavily.
- Less stability under wet or icy conditions: the driver may experience reduced traction and tyre slippage when driving on wet or icy roads.
Troubleshooting an ABS sensor
To identify the source of any sensor faults, consider the following steps:
- Connect a diagnostic tool, record the fault codes, and check the live data parameters for the ABS sensor.
- Use a multimeter and oscilloscope to check the supply voltages and signals using - take the measurement at the sensor connector to test the entire line between the control unit and sensor.
- Inspect the connectors and wiring of the sensors to ensure they are correctly positioned and secured, and for signs of damage or contamination.
- Check the sensor and impulse ring for damage.
- If dirt is present, clean the contact surface using a wire brush.
Common fault codes
Common fault codes and causes include:
- C0060: Left front ABS solenoid 1 circuit malfunction
- C0065: Left front ABS solenoid 2 circuit malfunction
- C0070: Right front ABS solenoid 1 circuit malfunction
- C0075: Right front ABS solenoid 2 circuit malfunction
- C0080: Left rear ABS solenoid 1 circuit malfunction
- C0085: Left rear ABS solenoid 2 circuit malfunction
- C0090: Right rear ABS solenoid 1 circuit malfunction
- C0095: Right rear ABS solenoid 2 circuit malfunction
How to replace a faulty ABS sensor
Once you’ve identified that the ABS sensor is at fault, follow these simple steps for a best practice sensor replacement:
- To start, loosen the wheel nuts before jacking the car up (do not remove wheel nuts yet). Consult your owner’s manual for correct jacking points, and ensure that the vehicle is raised and supported securely.
- Remove the wheels and move to the side to access the brake system.
- You may also need to remove the brake pads and discs to view and access the ABS sensor. Watch our YouTube video for best practice advice on how to do this.
- Once accessible, remove the bolt that holds the sensor onto the hub and the clips that secure the sensor wiring to the vehicle's chassis/body.
- Then unplug the sensor.
- Clean the area around the sensor with an emery cloth.
- Working in reverse order, it’s now time to install the new ABS sensor. Start by plugging in the sensor and then routing the harness back so it is secured to the body/chassis. Then insert it into the hub.
- If you had to remove the pads and discs, reinstall and torque to the correct specifications.
- Refit the wheels, tighten and lower the vehicle to the ground.
- Then torque tighten the wheels to the manufacturers specification.
- Reconnect the diagnostic kit and delete any fault code(s). Run the engine, and recheck for any new fault codes. Exit the diagnostic software and switch off the ignition.
- Finally check that the check engine light has been extinguished, then carry out a road test.
Related article resources and products


Contact Us
Visit our Contact hub to find a range of enquiry types suited to help you find the exact support you are looking for.