- Product Information
- Product Resources
- Enquire
- Related Products
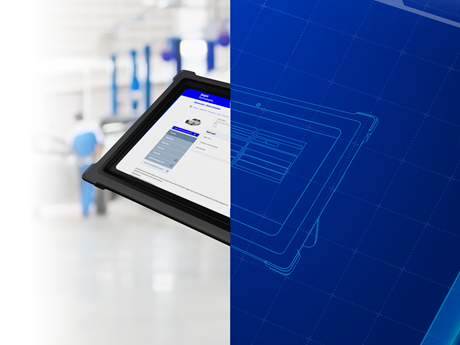
What’s included in the HEAVY DUTY package?
The HD package is available in 3 levels.
- VTI Truck Professional
Maintenance items, including service schedules, adjustment data and lubricants, torque settings and repair manuals.
- VTI Truck Business
As professional PLUS wiring diagrams (ABS and Engine management), repair times.
- VTI truck Ultimate
As Professional & Business PLUS Light commercial vehicles, additional 2 licences to be used simultaneously.
Let's now look at the details ...
• Guided diagnostics database

Full guided diagnostics from both fault codes, and component troubleshooting.
Includes detailed information at each stage for the technician.

Fuses and relay locations: easy to locate, and identify correct fuses, relays, bus bars and more.

Wiring diagrams: diagrams which make troubleshooting easier.

Torque figures and technical drawings: torque figures are shown in a drawing format, this makes it much easier for the technician to locate the correct data. This is especially important when dealing with complicated multi-link suspension.

OE service and maintenance schedules: with the OE service number shown.

Repair manuals: VTI offers full guided repair manuals included timing belt / chain instructions, Transmission, Steering and Suspension, Brakes, plus Interior and Exterior trim instructions.

Are you interested in Vehicle Technical Information for a car or light commercial vehicle?
Check out the VTI CAR.
The Delphi Difference
-
100 years of OE experience, supplier to the world’s top automakers
-
OE heritage and knowledge built into every aftermarket part
-
Comprehensive portfolio for a wide range of vehicles and model years
-
Streamlined SKUs for easy inventory management
-
Support through tools, tips and training

Related product resources and downloads
Resource Highlights
In this article you will find a step by step guide on how to Diagnose intermittent failure to start engine.
The vehicle: Renault Laguna 1.8L Petrol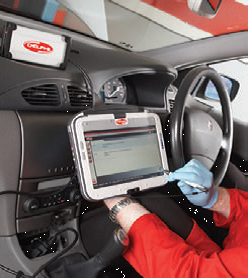 | The symptoms: Intermittent failure to start engine. The solution: The technician connected Delphi’s DS350E diagnostic tool to the OBD diagnostics socket to interrogate the vehicle’s fault code history. Fault returned: ‘DF017 Flywheel signal sensor circuit, tooth signal missing – intermittent,’ indicating a fault with the crankshaft sensor. |
Step 2 | The fault codes were erased using DS350E. After erasing the fault, the technician restarted the engine several times to find the fault was still present, as confirmed by a second run of DS350E diagnostics. |
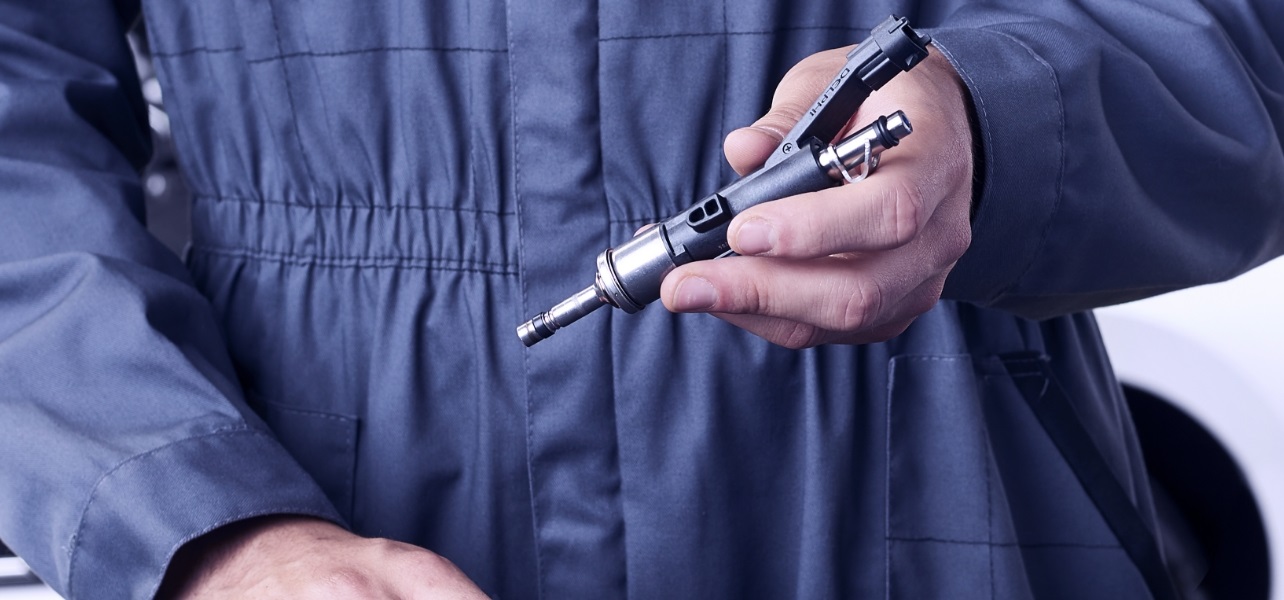
Step 3 | The technician removed the crankshaft sensor and visually inspected the part for damage of measurement tip. |
Step 4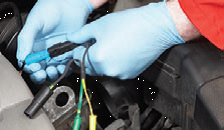 | In preparation for further interrogation with Delphi’s PicoScope, the technician disconnected the crankshaft sensor from the harness and inserted a Delphi mini-bob (mini break-out box) between the two connections. Delphi’s mini-bob connectors are used to enable technicians to gain access to the wiring without damaging the insulation. |
Step 5 | The technician connected PicoScope to Delphi’s convertible PC, DS350E, (or other laptop computer) and started the PicoScope software. The technician then used the Delphi waveform library, choosing Delphi/Automotive/ Sensors/Crankshaft/Inductive/Running or Cranking. This opened up a reference waveform, which demonstrated how a good sensor should perform. Opening up the library automatically enables the correct measurement settings for the PicoScope. |
Step 6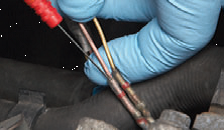 | The help guide automatically opened with information on how to connect the PicoScope, some example waveforms, and technical information (where applicable). The technician followed the easy to understand instructions, exclusive to the Delphi PicoScope software, to insert the PicoScope probe into the two pin test lead adaptor, otherwise known as the mini-bob (already fitted to the sensor connection). |
Step 7 | With the measurement settings already set and the probe connected to the mini-bob, the technician started the engine and began diagnostics by hitting the space bar to start capturing waveforms. The technician found a good signal from the crankshaft sensor, with waveform patterns matching the example. |
Step 8 | The technician fitted a Delphi break-out box to the ECU to determine why it was still showing a fault. The PicoScope was then connected to the correct pin numbers on the break-out box in order to once again capture a waveform from the crankshaft sensor. At this point it was found that there was no signal from the sensor to the ECU. |
Step 9 | The wiring harness was visually inspected for signs of damage. This led to the discovery of a soldered connection in the wiring harness from a previous modification. |
Step 10 | The acupuncture probe was fitted to both sides of the soldered joint, with a direct connection to two channels on the PicoScope. Once connected, the technician captured waveforms with the Delphi PicoScope software to find when the wiring harness was moved, the signal was lost on the ECU side of the soldered joint – indicating a broken wire. |
Step 11 | Using a harness repair kit, the technician repaired the broken wire and re-tested the signal using PicoScope and the ECU break-out box to establish there was now a good signal between the sensor and ECU. Once this was confirmed, the technician disconnected the PicoScope, break-out box and mini-bob. |
Step 12 | The final step was for the technician to re-interrogate with the DS350E, clear all fault codes to confirm that the fault has been eliminated. Job done! |
Technician’s Tool Box | DS350E Delphi’s latest innovation in vehicle diagnostics, the DS350E convertible PC, offers advanced and up-to-date diagnostic software, providing capability across the vehicle’s key electronic systems. PicoScope Equipped with exclusive software, developed by Delphi engineers, the 4-channel scope kit provides technicians with the ability to interrogate the vehicle’s electronic and mechanical systems more effectively when identifying faulty components. Harness Repair Kit Electrical system harnesses, also known as wiring looms, are vital to system performance. Delphi’s harness repair kits enable technicians to repair the harness efficiently and cost-effectively. Break-out Box An interface between the vehicle’s ECU (or specific component depending on the type of break-out box used) and the wiring loom, Delphi’s break-out box facilitates the use of a multi-meter or PicoScope to measure voltage, continuity and waveforms. This tool provides a safe and effective way of testing wiring looms without puncturing the insulation with needle probes. Mini-bob Specifically designed to analyze the increasing number of sensors, actuators and electronic circuits, Delphi’s ‘mini-bob’ break-out cables allow the testing of sensors while avoiding damage to vehicle components. Delphi offers these cables across a wide range of vehicle electronics systems, including braking and air conditioning. |
Resource Highlights
In this article you will find a step by step guide on how to Diagnose intermittent failure to start engine.
The vehicle: Renault Laguna 1.8L Petrol | The symptoms: Intermittent failure to start engine. The solution: The technician connected Delphi’s DS350E diagnostic tool to the OBD diagnostics socket to interrogate the vehicle’s fault code history. Fault returned: ‘DF017 Flywheel signal sensor circuit, tooth signal missing – intermittent,’ indicating a fault with the crankshaft sensor. |
Step 2 | The fault codes were erased using DS350E. After erasing the fault, the technician restarted the engine several times to find the fault was still present, as confirmed by a second run of DS350E diagnostics. |
Step 3 | The technician removed the crankshaft sensor and visually inspected the part for damage of measurement tip. |
Step 4 | In preparation for further interrogation with Delphi’s PicoScope, the technician disconnected the crankshaft sensor from the harness and inserted a Delphi mini-bob (mini break-out box) between the two connections. Delphi’s mini-bob connectors are used to enable technicians to gain access to the wiring without damaging the insulation. |
Step 5 | The technician connected PicoScope to Delphi’s convertible PC, DS350E, (or other laptop computer) and started the PicoScope software. The technician then used the Delphi waveform library, choosing Delphi/Automotive/ Sensors/Crankshaft/Inductive/Running or Cranking. This opened up a reference waveform, which demonstrated how a good sensor should perform. Opening up the library automatically enables the correct measurement settings for the PicoScope. |
Step 6 | The help guide automatically opened with information on how to connect the PicoScope, some example waveforms, and technical information (where applicable). The technician followed the easy to understand instructions, exclusive to the Delphi PicoScope software, to insert the PicoScope probe into the two pin test lead adaptor, otherwise known as the mini-bob (already fitted to the sensor connection). |
Step 7 | With the measurement settings already set and the probe connected to the mini-bob, the technician started the engine and began diagnostics by hitting the space bar to start capturing waveforms. The technician found a good signal from the crankshaft sensor, with waveform patterns matching the example. |
Step 8 | The technician fitted a Delphi break-out box to the ECU to determine why it was still showing a fault. The PicoScope was then connected to the correct pin numbers on the break-out box in order to once again capture a waveform from the crankshaft sensor. At this point it was found that there was no signal from the sensor to the ECU. |
Step 9 | The wiring harness was visually inspected for signs of damage. This led to the discovery of a soldered connection in the wiring harness from a previous modification. |
Step 10 | The acupuncture probe was fitted to both sides of the soldered joint, with a direct connection to two channels on the PicoScope. Once connected, the technician captured waveforms with the Delphi PicoScope software to find when the wiring harness was moved, the signal was lost on the ECU side of the soldered joint – indicating a broken wire. |
Step 11 | Using a harness repair kit, the technician repaired the broken wire and re-tested the signal using PicoScope and the ECU break-out box to establish there was now a good signal between the sensor and ECU. Once this was confirmed, the technician disconnected the PicoScope, break-out box and mini-bob. |
Step 12 | The final step was for the technician to re-interrogate with the DS350E, clear all fault codes to confirm that the fault has been eliminated. Job done! |
Technician’s Tool Box | DS350E Delphi’s latest innovation in vehicle diagnostics, the DS350E convertible PC, offers advanced and up-to-date diagnostic software, providing capability across the vehicle’s key electronic systems. PicoScope Equipped with exclusive software, developed by Delphi engineers, the 4-channel scope kit provides technicians with the ability to interrogate the vehicle’s electronic and mechanical systems more effectively when identifying faulty components. Harness Repair Kit Electrical system harnesses, also known as wiring looms, are vital to system performance. Delphi’s harness repair kits enable technicians to repair the harness efficiently and cost-effectively. Break-out Box An interface between the vehicle’s ECU (or specific component depending on the type of break-out box used) and the wiring loom, Delphi’s break-out box facilitates the use of a multi-meter or PicoScope to measure voltage, continuity and waveforms. This tool provides a safe and effective way of testing wiring looms without puncturing the insulation with needle probes. Mini-bob Specifically designed to analyze the increasing number of sensors, actuators and electronic circuits, Delphi’s ‘mini-bob’ break-out cables allow the testing of sensors while avoiding damage to vehicle components. Delphi offers these cables across a wide range of vehicle electronics systems, including braking and air conditioning. |


Visit our Technician Library for access to Documents and Downloads
Get in touch
Find out where to buy Delphi parts